

how to illustrate a book if you can't draw
Alphabetize
- Choosing the story
- Choosing of painting style + Moodboard
- Structure and sketches (Storyboard).
- Using the Color Palette
- Sound effects color
- Sketching
- Text Insertion
- Paging and print grooming
- Digital version (EPUB)
- Let's use Prune Studio Share
1. Choosing the story
Children's stories take existed for centuries. Many traditional tales take passed orally from generation to generation until the invention of the printing press was able to capture these stories on newspaper. These stories alter over time, but their original purpose was to entertain and teach, often through morals, and to show the reality of the order of their time.
In full general, children'south stories tend to exist succinct since they aim to continue the attention of their audience while being fun and educational at the aforementioned time. Therefore, our book will not take much text. Consequently, it volition also non have many illustrations, so it is essential to illustrate the key moments of the story in a limited number of works.
Although we are going to create our book from scratch, if you already have a story completed (original or commissioned), the process will be the same except for this first step.
At present, let us brainstorm by choosing a story.
In this specific instance, our base of operations volition exist Children's literature classics, whether they are fables by Aesop or fairytales by Perrault, the Grimm Brothers, or Andersen.
Non all books are easy to illustrate. Although the children's genre is generally quite straightforward and uses highly recognizable elements, there are both simpler and complex stories. The all-time kind to practise illustrating would be one that contains characteristic elements, such as animals, princes, dragons, pirates, fairies, etc. If we choose a story with more than abstract components, it volition exist much more challenging to illustrate, every bit information technology would rely on our subjective vision of that element, which may not be understood by everyone. Things similar feelings, concepts, or ideas are complicated to illustrate, particularly if there are no characters to portray them.

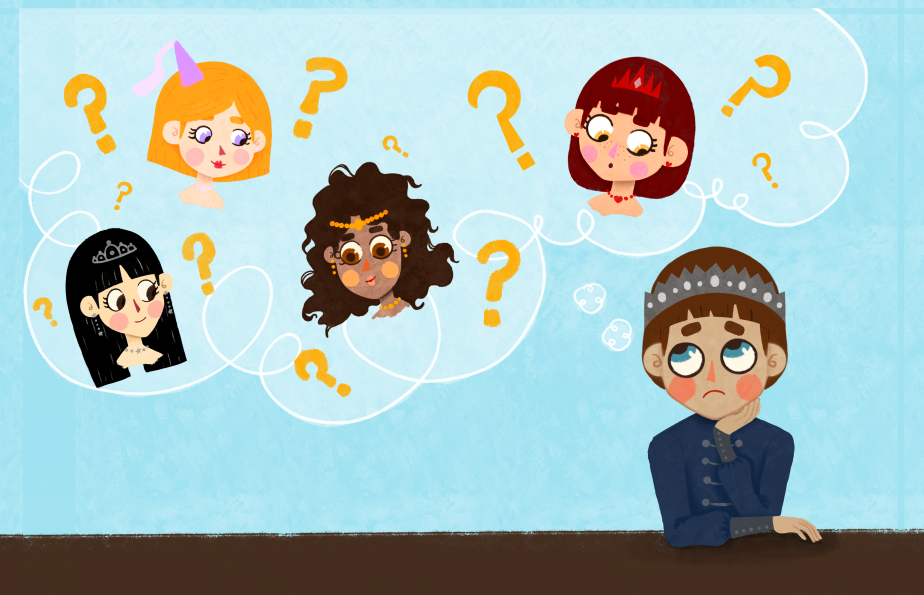
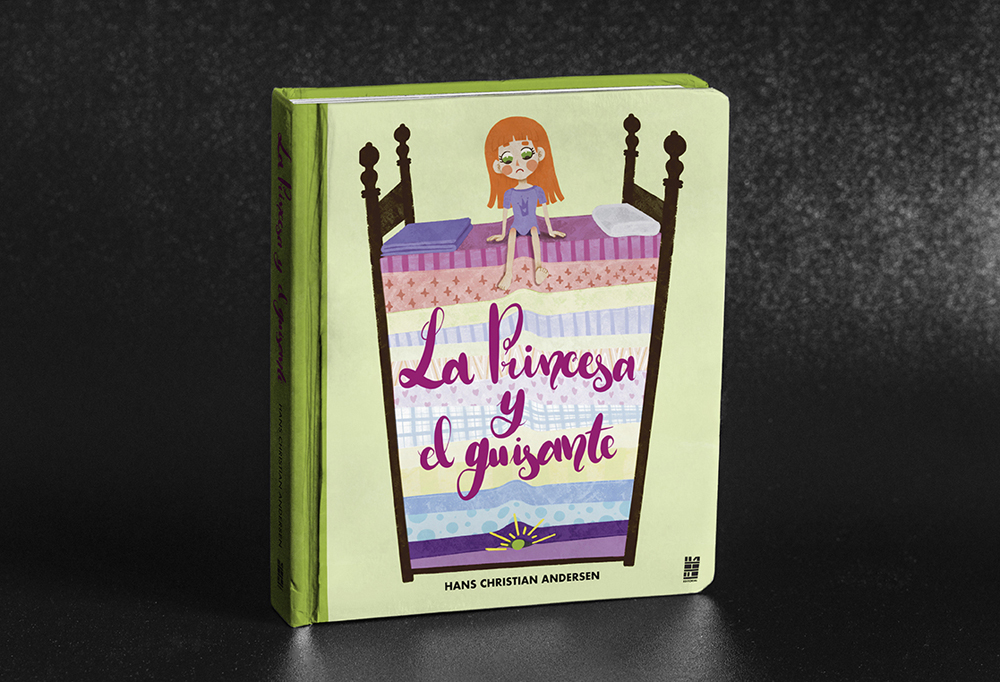
The story we have chosen is "The Princess and the Pea" by Hans Christian Andersen. In this tale, the characters are simple and limited in number. The princess is our protagonist, the one the prince seeks from the beginning and the ane who volition bear the weight of the story. The prince is the common thread, the one who gives u.s.a. a reason to tell the story. The queen is a type of antagonist, questioning the identity of our princess. The king does non contribute much, a secondary character whose just office is to be and support the main characters. The pea is as of import as the princess considering, without either of them, there would accept no story. Despite existence such a brusk story, the characters are of great importance.
As for the story itself, it is unpretentious and straightforward, information technology has a specific setting, and the storyline is brief, but it tells usa everything we demand to know.
Now that we have chosen our fairytale, we can become to the second pace.
2. Choosing of painting way + Moodboard
When choosing a painting mode, information technology is of import to have references. Although everyone has their ain style when drawing, it may non suit the type of illustration necessary for the genre of the book we are going to illustrate.
In this instance, illustrating a children's book, it is unlikely that styles such as hyperrealism, abstract —or if we opt for manga, seinen— are the right choice, because the kind of atmosphere these styles would add to the story is the contrary to the tale itself. Information technology would create confusion instead of facilitating agreement. It is better to use organic shapes and low-cal colors as opposed to geometric, angular shapes with dark and slightly saturated colors.
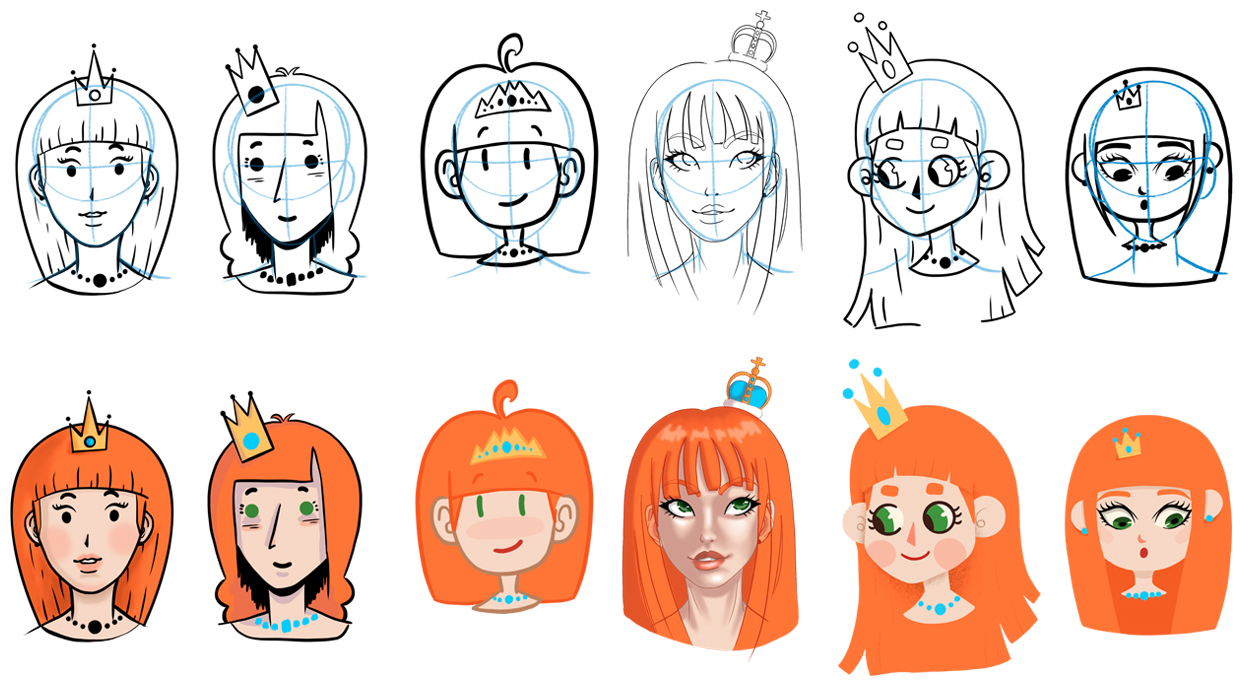
Uncomplicated, schematic figures with master recognizable elements are generally ideal when illustrating a children's book. One time nosotros take the basic features that ascertain our characters, nosotros can so vary their style—aspects like center size, the proportion of the body parts, etc.
To help united states of america create illustrations that friction match our story, we will need to create a mood board. In it, we will gather examples by colour palette, illustration mode, or composition, to assistance the states to form a preliminary thought of what we want. Nosotros can create it in a binder or via Pinterest, where we will go on all those images that requite u.s.a. something and from which we can acquire and then create our illustrations. Trying to re-create the styles of other illustrators is a proficient practise to help develop drawing skills in areas we might not necessarily exist practiced in. But keep in mind that when presenting something professional, we must ever utilise our original content.
Here is the link with a lath I put together. Information technology contains examples of children's volume illustrations that I found interesting for creating this book: https://world wide web.pinterest.es/judithzzyuko/childrens-book-analogy/
Even later on choosing a style, yous may nevertheless have doubts about your characters, whether their pattern, colors, or construction is what y'all want. If we as well many characters, our story will become too broad and will demand a large number of illustrations. As well, if they are too complex with also many elements, we would need to create a character guide to do multiple views and color tests.
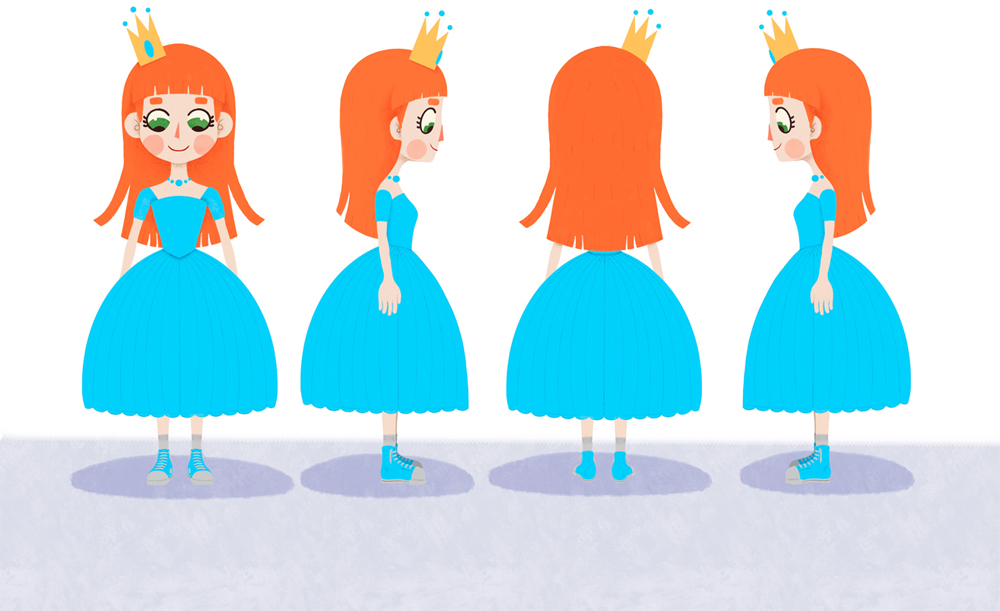
Simple is better, just ane frontal view per character. Or perhaps a turnaround. A turnaround is a series of views of a graphic symbol, usually betwixt 4 and eight, which allows us to see all their elements from different angles, as shown below. I drew the grapheme here in a plain, relaxed pose every bit I want to show its pattern and not any specific activity.
3. Structure and sketches (Storyboard).
Although all parts in our story are of import, to create the structure and so the sketches, we must choose which parts all-time represent the story. We must divide it then that the text is reasonably balanced. For example, we shouldn't create a folio with a single sentence and another where the text takes ninety% of the space. So, if at that place are 2 essential pieces of text on the page, either we must choose the most important of the two and illustrate it, or we should create an analogy that allows usa to illustrate both parts flawlessly.
All stories have a recognizable basic structure: introduction, body, and conclusion. In our story, there are at least 4 major plot points, divided as follows:
- Presenting the situation: The prince wants to go married.
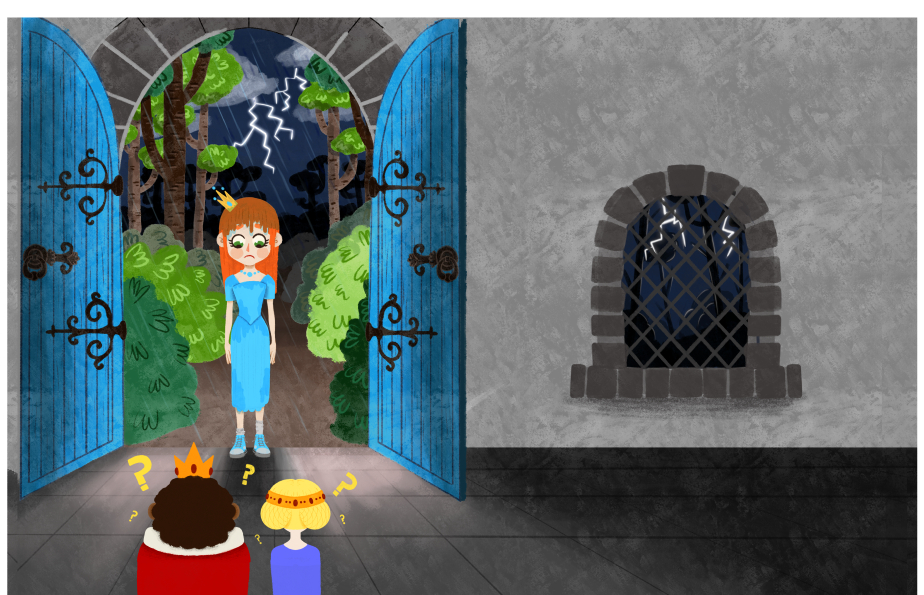
- Introducing the main character: The princess arrives at the castle.
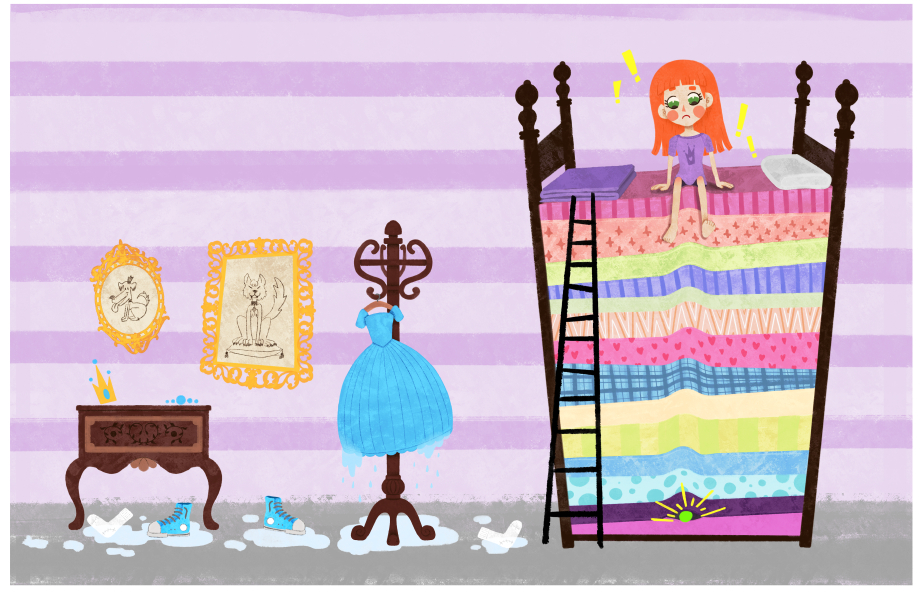
- Disharmonize: To check if she is a princess, the queen places a pea nether her bed.
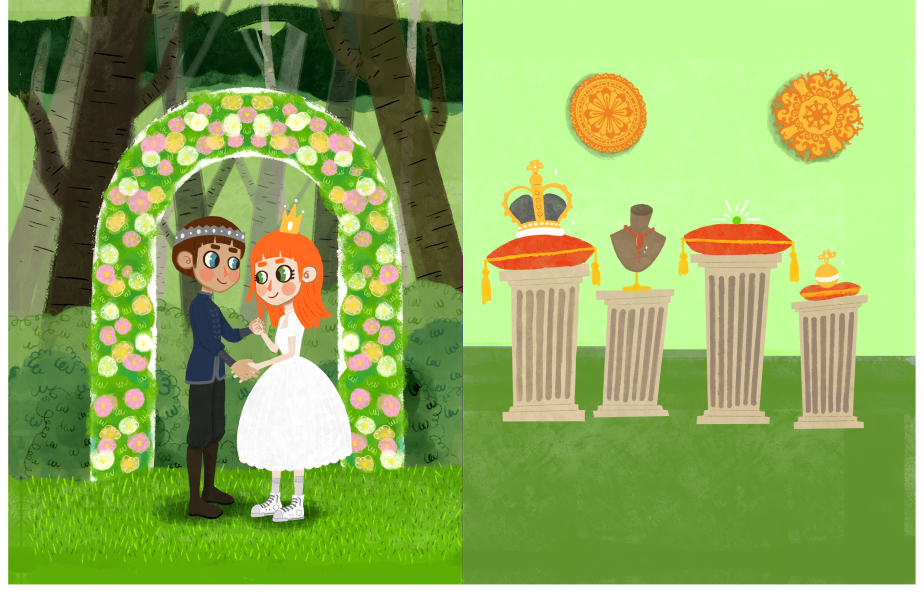
- Resolution: The princess is a existent princess and therefore marries the prince.
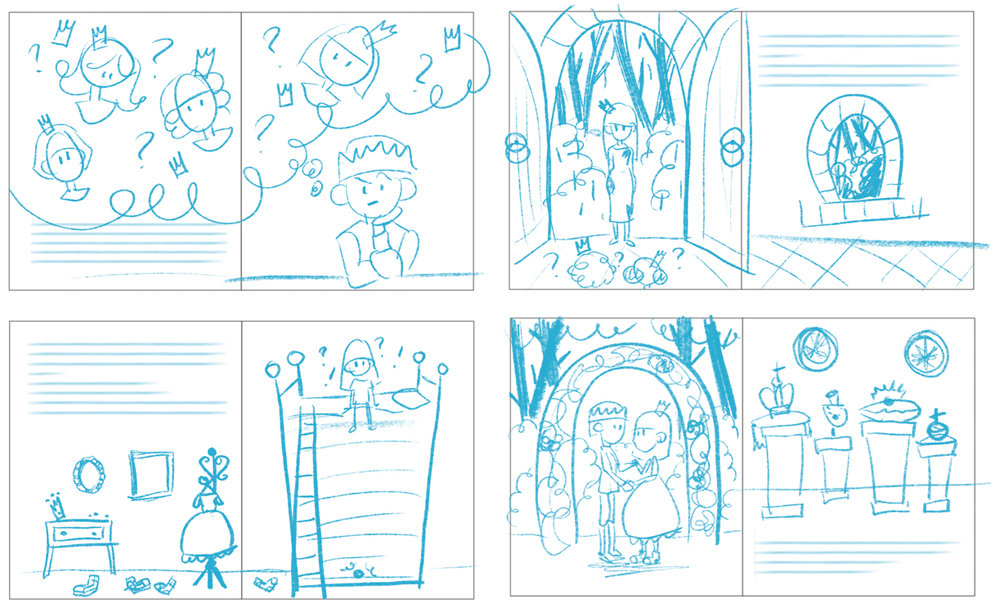
And then we add the cover (cover, spine, and dorsum comprehend) and where the main elements of the story must appear. Once nosotros take this structure, we can starting time sketching the storyboards. Storyboards will be created in double pages. The text will only take upwardly part of one page, leaving at least 80% of the infinite to exist filled with illustrations. To visualize the illustrations on the page, nosotros'll first create thumbnail sketches. Since it is only a sketch, the resolution of the images doesn't need to be very high or detailed.
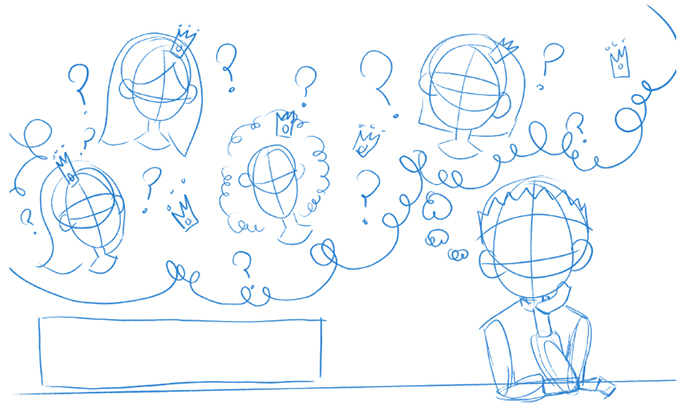
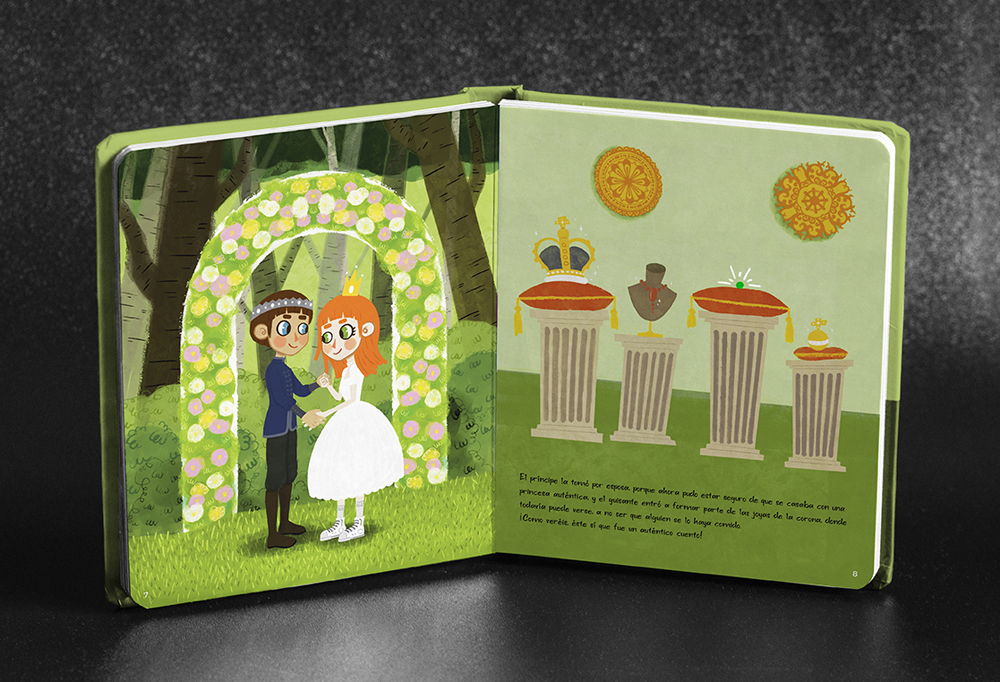
On the first couple of pages, we draw the prince thinking about all the princesses he has met on his travels around the world. On the 2nd page, the arrival of the protagonist, the princess, at the prince's castle on a stormy night. On the tertiary page, the princess in her bed, wondering what is preventing her from sleeping. And finally, the wedding. As a final touch on, the pea will take a special place among the royal treasures.
Try to make all the modifications in the sketching phase and then that they can be avoided equally much as possible one time the analogy process has started. This volition salvage u.s.a. a lot of work. Move elements, playing with different sizes, suit page composition while keeping in mind that we demand to exit room for the text.
If the illustrations are well thought out, yous should take a skillful idea of what is happening in the story even without text.
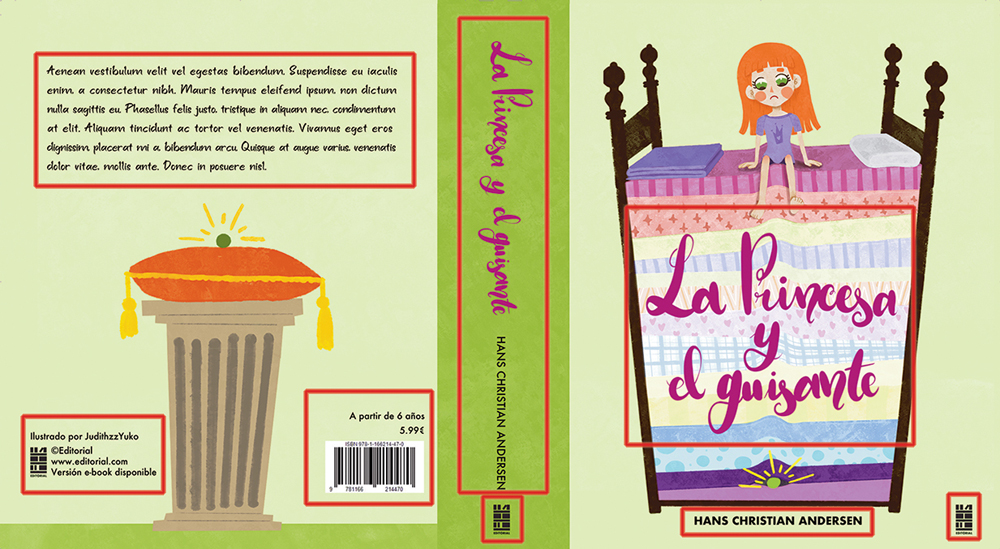
In one case we have the interior pages sketched, we will focus on the cover. The book cover should have a widely recognizable element of the story. In this case, the princess, and the pea, which is repeated in the title of the book. Together with the bed, these elements become the cover of our volume. We can apply role of ane of the illustrations from inside the book or create a totally new illustration.
Do non forget to place the championship, writer, and other components, such as the publisher's logo. Nosotros can also add the name of the illustrator if we want information technology to be as important as the writer. In this case, I volition make it a little more subtle and identify it with the other data on the back cover. Here we will have the synopsis, barcode, and other relevant information (we will get back to this afterward). Every bit for the dorsum embrace analogy detail, we don't want anything that reveals too much about the story, simply it should still be relevant —in this case, we'll use the pea. Bear in mind that, even though these are traditional and well-known stories, not everyone, specially children, know of them, then we need to requite them something that catches their attention, plenty to make them want to know what happens inside the book!
The spine is the simplest of all the designs and consists but of the title, author, and logo. As on the cover, we may add together the proper name of the illustrator.
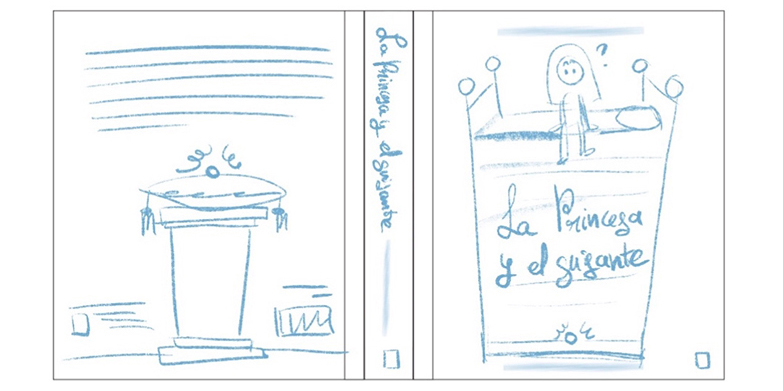
At that place are different opinions about the direction of the elements of the spine. I personally like that the title of the book can be read when the encompass is facing upward, so I will place the text turned to the right.
4. Using the Color Palette
There are two dissimilar methods of cull typography. We tin apply neutral typography that neither adds nor takes annihilation from the illustrations or the other way effectually, or use typography that complements our manner and the general concept of children's books.
For the start option, we should ideally apply an easy-to-read font, with orsans serif, which does not accept any blazon of flourish or exaggerated graphic elements—for example, these.
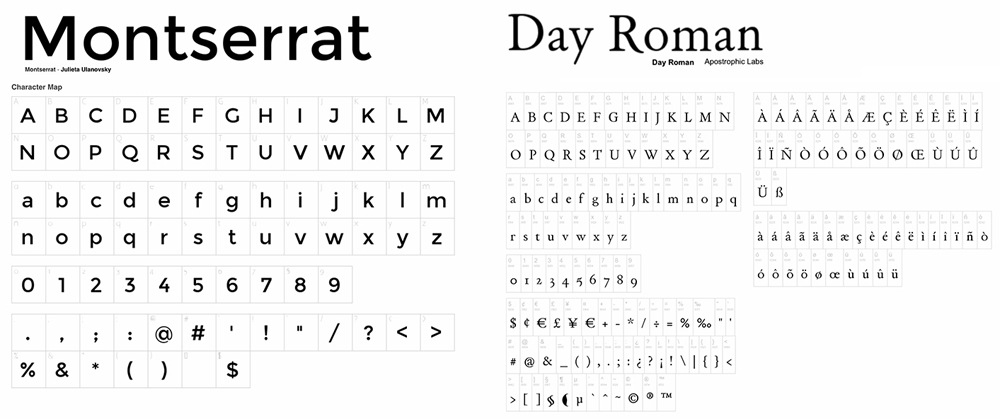
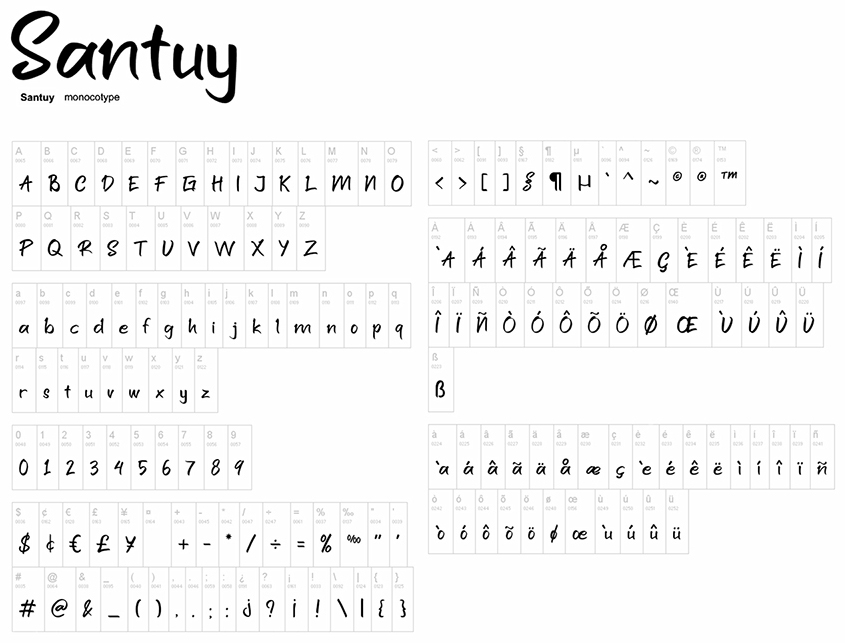
For this book, I chose a typeface with a piffling more personality to enhance the design of the book. This font aims to imitate handwriting, effortlessly evoking the feeling of a children's book. If you determine to go with the latter method, remember that, apart from having a specific aesthetic, these fonts tend to make reading more difficult.
If your volume is aimed at very young children, a good piece of advice is to proceed the typography rather large. Your font decisions should all depend on the intended audience of the book.
I will use the old fonts inside the volume and in the synopsis on the back cover. I am going to write the primary title of the embrace and spine manually. For the rest of the information on the encompass, I will go for a cleaner and easier to read typeface. I do not recommend using more than than three different fonts in total, equally information technology creates defoliation regarding text hierarchy, and results in a cluttered looking book.
With the typography called and the primary sketches complete, we can begin to call up about the color palette of our illustrations. As with the style of our drawing, there will be certain palettes that practise not harmonize with illustrations meant for children. Dark and highly desaturated colors may not work well.
There are two colour schemes for creating a palette: CMYK (Cyan, Magenta, Yellow & Black) and monochrome. With CMYK (1), we tin can use any colour without limitation and brand the illustrated objects have the same color as those objects in real life if that is our goal. We tin choose more than saturated and vivid colors or opt for pastel tones. The latter works especially well if the illustrations are aimed at very young children. With monochrome (ii), we apply a unmarried colour, using variations of that colour in saturation and brightness to create contrast between elements. Yous tin also create variations of the latter by adding more colors, using the same limitations. For example, in duotone (iii), we used an boosted two colors and their saturation and brightness variations.
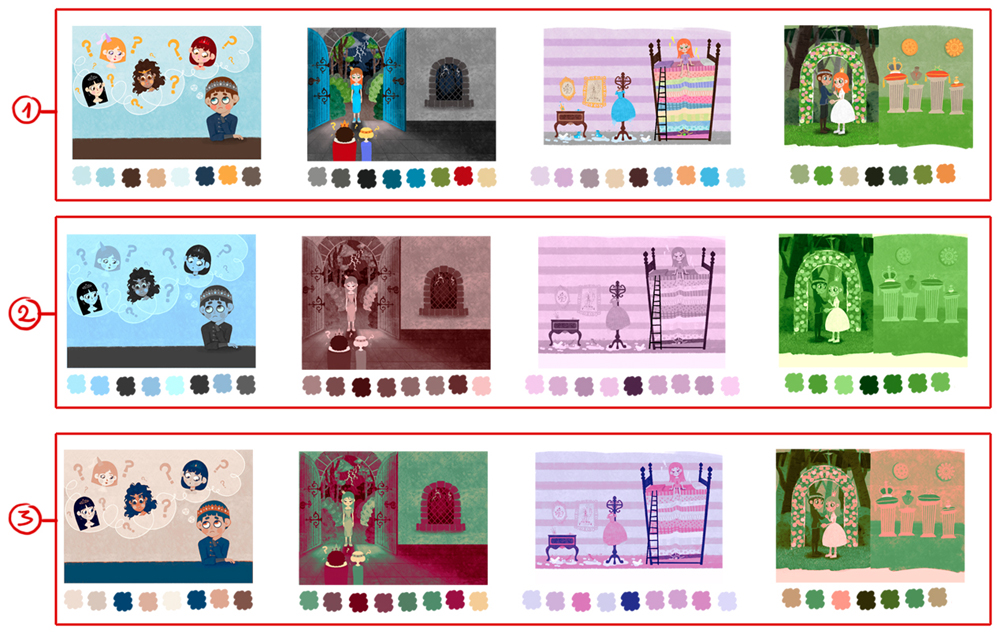
In the aforementioned storyboard, we can color using the basic colors to go an initial thought, especially if we are looking for a specific aesthetic option, such as duotone. This is the moment you will want to play with different color palettes so you can easily modify them to see which 1 best suits your story.

v. Audio furnishings colour
I will create this book using Clip Studio Pigment EX because, apart from being an first-class coloring tool, it also allows me to layout several pages at in one case and export them with ease, with all the print settings needed.
Now, nosotros can first illustrating our book.
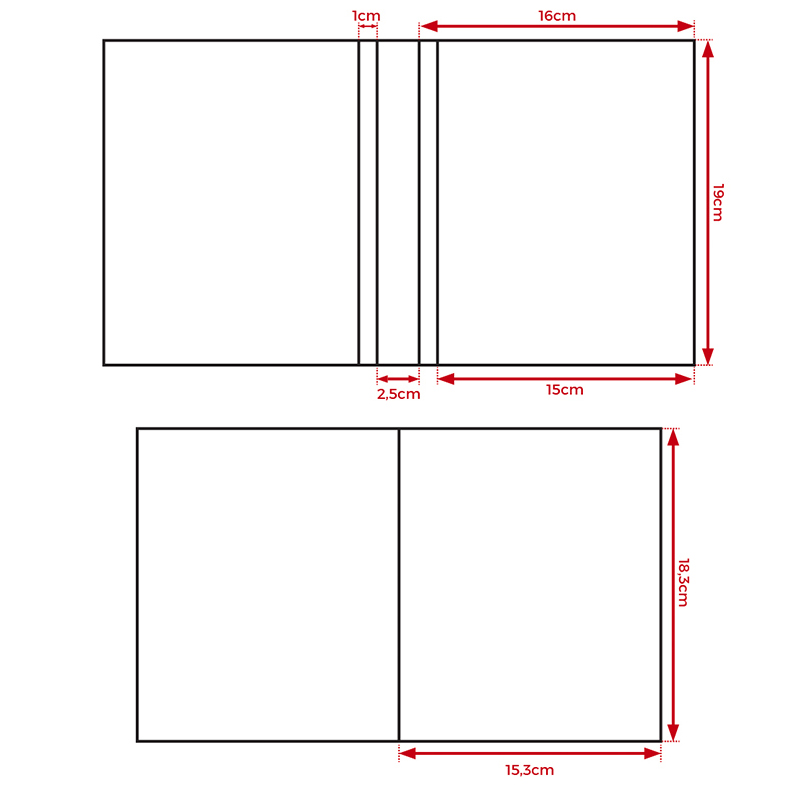
The book we are going to illustrate is eighteen.3 cm ten 15.three cm within. Its comprehend is 19 cm x by 16 cm, and its spine is 2.5 cm wide. Keep in mind that at that place is a centimeter on the cover that is part of the spine, and that will exist a unlike color than the cover. (This will vary depending on the type of book being designed.)
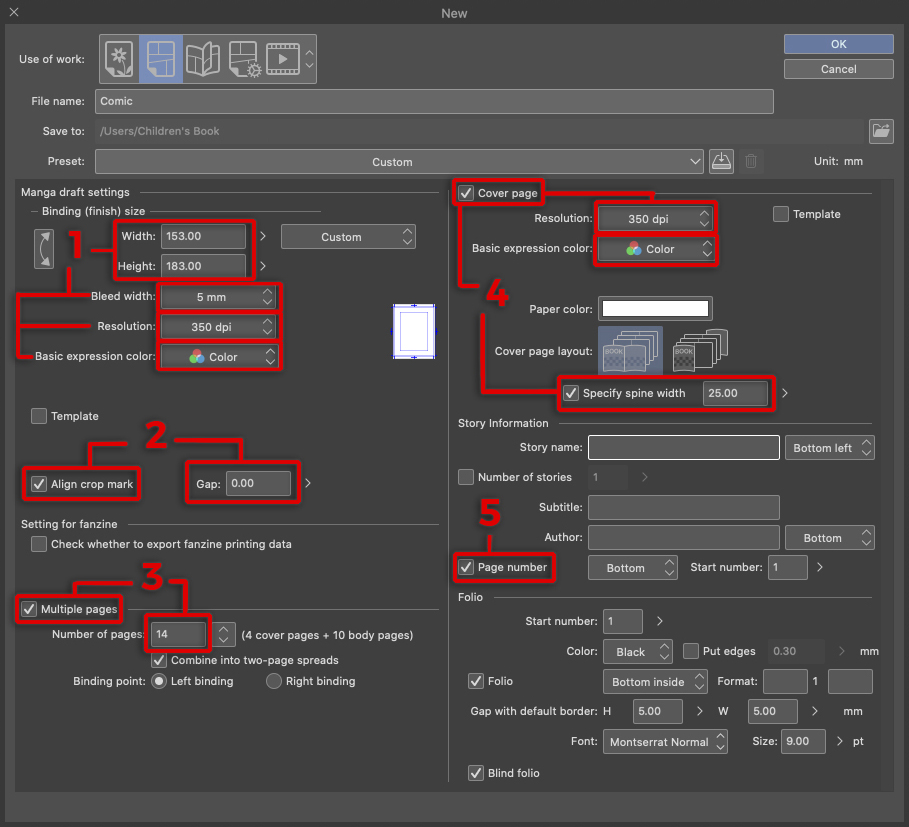
Create a [Comic] file and, as in the reference image below.
In department ane, enter the dimensions of the volume body, in our case, 153 mm x 183 mm, and a resolution of 350 dpi. It is not necessary for our book to have a resolution greater than 300 dpi. So, add 5 mm bleed, which will be used to avoid blank spaces at the edges when nosotros print the book. And finally, in [Basic expression color], select [Color].
Nosotros do not desire a separation between the double pages of our illustrations, so, in section 2, check the [Align crop mark] box and give it a value of 0.00 mm.
In section 3, bank check the [Multiple pages] box and enter the number of pages plus 2 for the outer cover, two for the inner cover, and an additional two. The additional two ensures that our illustrations outset on the left and finish on the right when we illustrate in double pages. In our case, since in that location are four illustrations in the volume, at that place will exist eight trunk pages, four cover pages, and two extra pages: In total, 14 pages.
In section four, check [Comprehend page] and set the dpi to 350. In this case, I will set the spine to 25mm.
Click [Page Number] in section 5 and leave the balance of the options set to their defaults. Nosotros volition discuss more nigh book pages later.
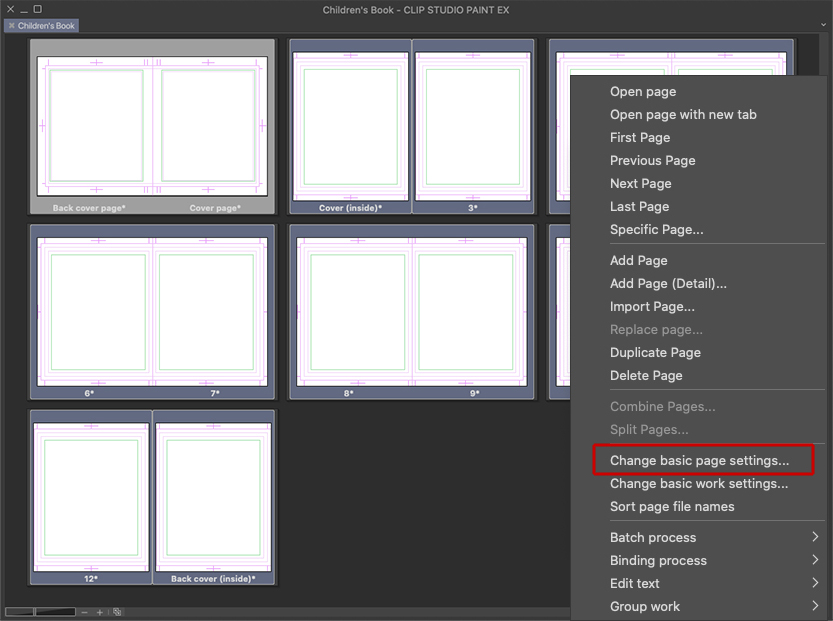
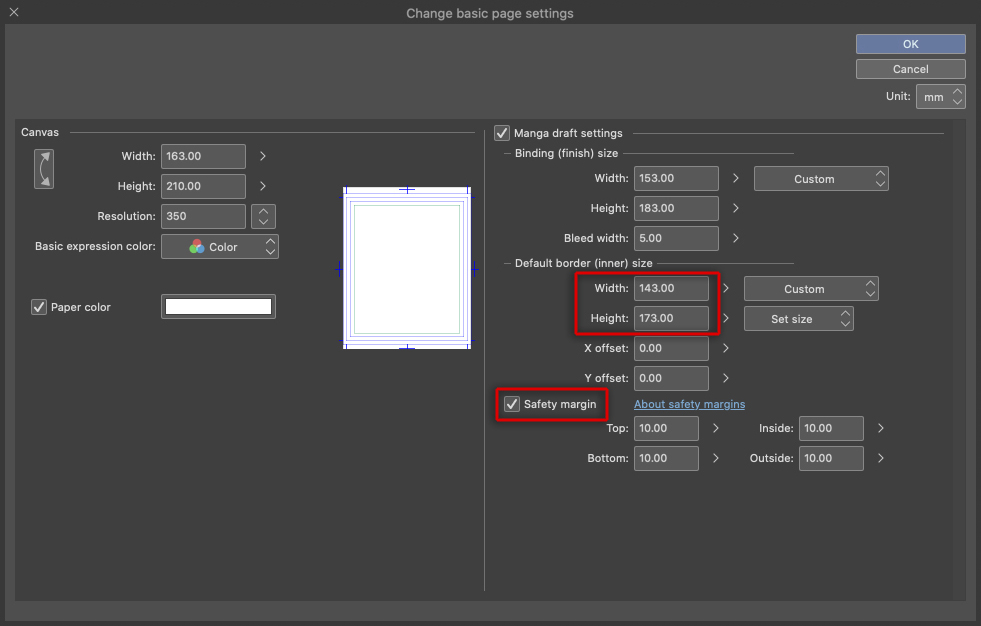
One time the certificate is created, select the body pages by pressing Ctrl + click and and then correct-click on any one of the selected pages that opens a menu. Select [Modify basic page settings] from the menu.
A new dialogue box will appear, in which we alter a couple of things. In [Default border (inner) size], we will prepare the value to 1 cm less than the size of our folio, both width and superlative, and the [Prophylactic margin] to 10 mm. These 2 changes will be useful when creating page guides. Folio guides help u.s.a. meet the usable space on our folio so we can piece of work without having whatsoever fear of text or images being cut when printing, either past the external edges or by the binding of the spine. Therefore, nosotros must try to keep our important illustrations and text within these safety margins.
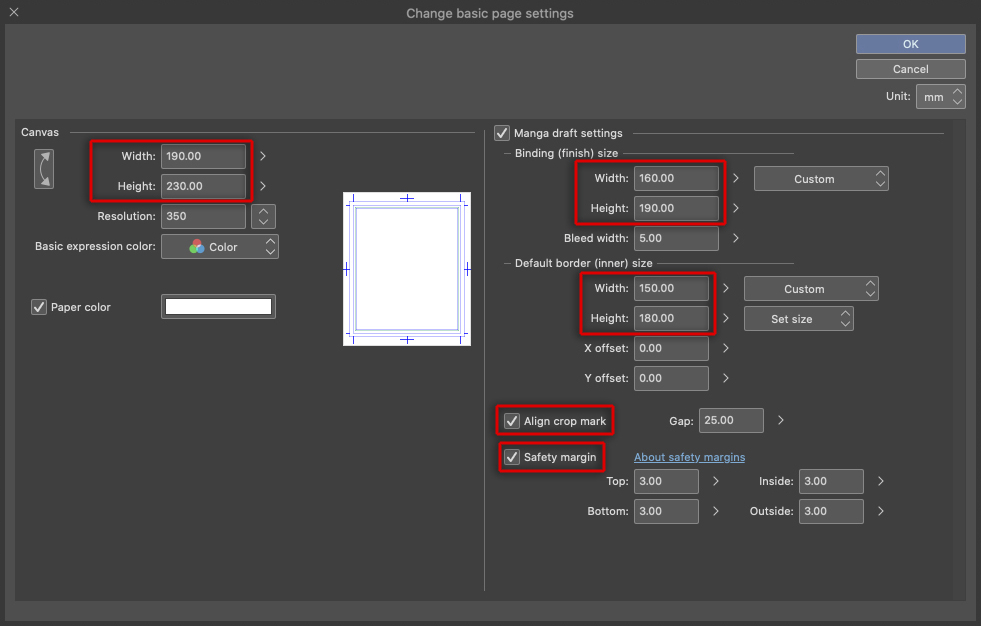
Perform the previous operation again, and select [Change basic page settings], but this fourth dimension for the embrace, and then make certain that no other pages are selected.
The dialogue box that appears is a bit similar the previous one. In this case, we will not only add guides, only we will too alter the size of the cover. If your embrace and body take the same size, you tin can skip this step. Otherwise, enter the measurements of the cover in the [Bounden (finish) size] department in the upper right role of the window, leaving 5mm of bleed. But below, change the [Default border (inner) size] by subtracting one cm from both peak and width. To the right of the window, add together a couple of centimeters for the bleed and the cut lines and to enable working comfortably in the canvas. Also, brand sure that [Align ingather marking] is checked and that its value is 25mm. For the spine width, check [Safety margin] and choose a value of 5 mm instead of ten mm.
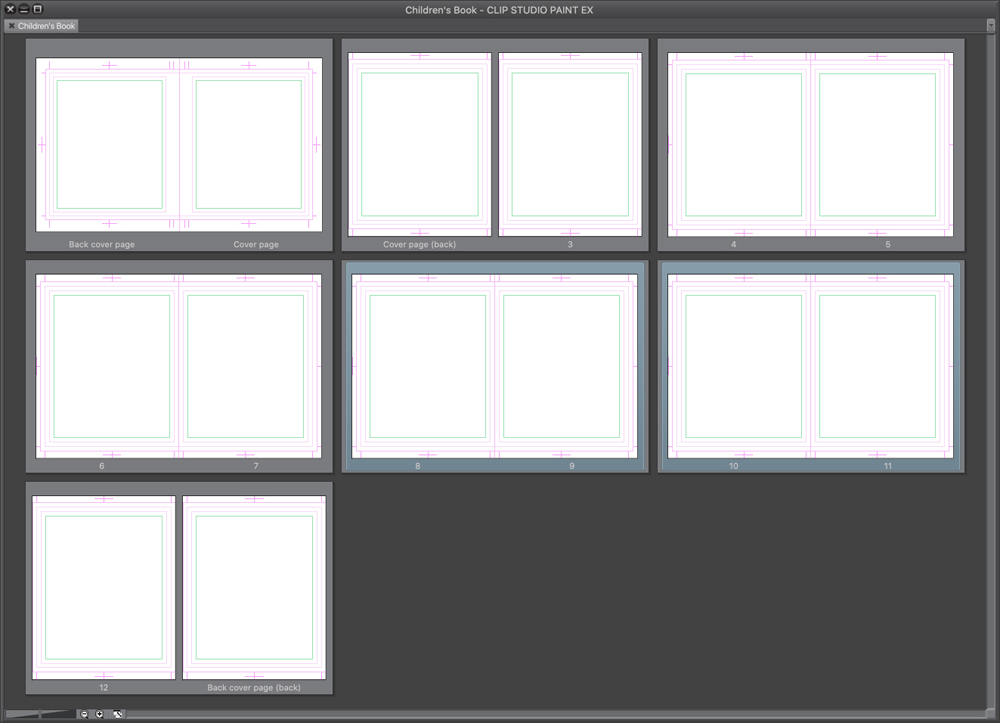
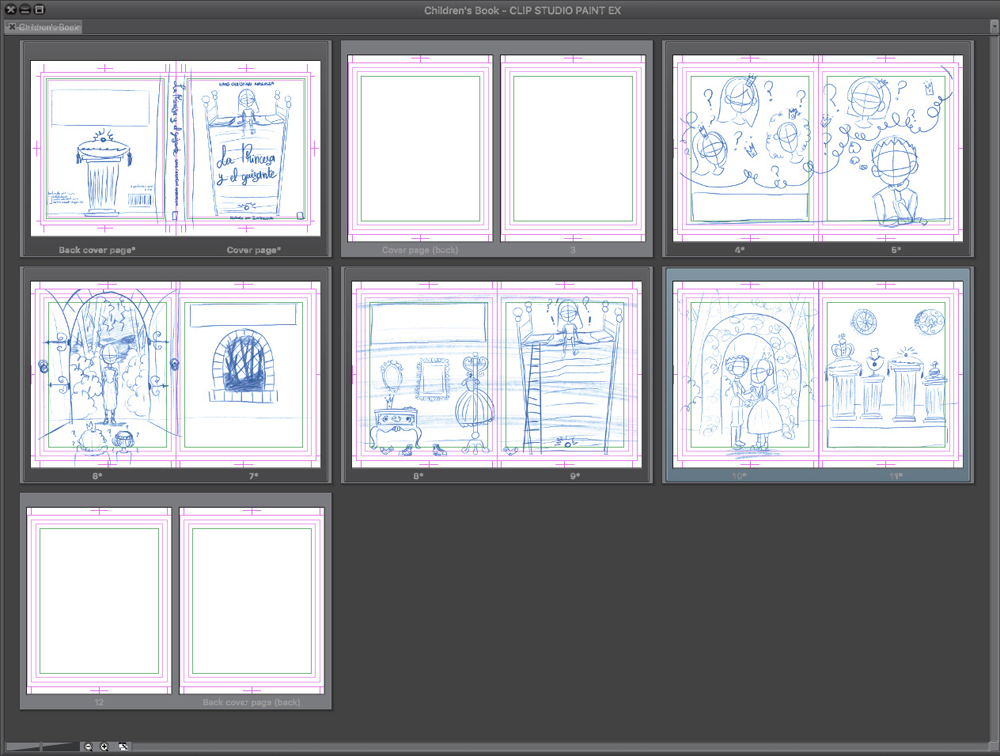
Once we are done, all the pages will be set, and we can start freely illustrating. The set of thumbnail pages will appear every bit shown in the post-obit prototype. To open the page you lot want to work, double-click it.
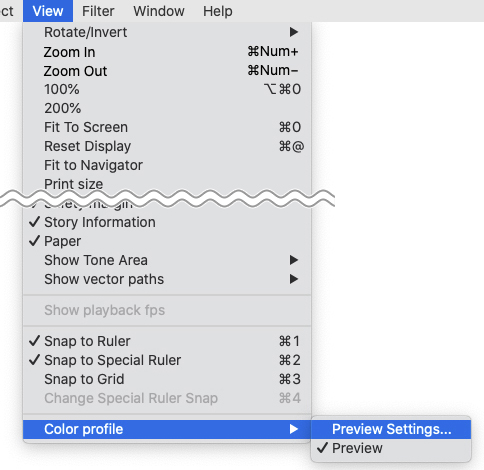
When opening a page, brand certain the color mode is set to CMYK and non RGB, since our intention is to print in the future. Then, earlier starting to work on each page, go to the [View] window > [Color profile] > [Preview settings], and in the drop-down list, select the basic CMYK profile. Keep in heed that colors vary from RGB to CMYK mode, and then it is recommended to work direct with the appropriate color mode from the first.
6. Sketching
Personally, I prefer to sketch in a divide document and and then import the layer into the final document, merely if yous want, you tin can create this document outset and sketch in it directly. Since I already accept the sketches, I re-create and paste them onto each page, leaving the second pair of pages and the concluding one blank. It looks as follows:
Depending on the style we have chosen, we tin can beginning inking the lines, or adding color. In the following prototype you can run across dissimilar inking options in the same cartoon way.
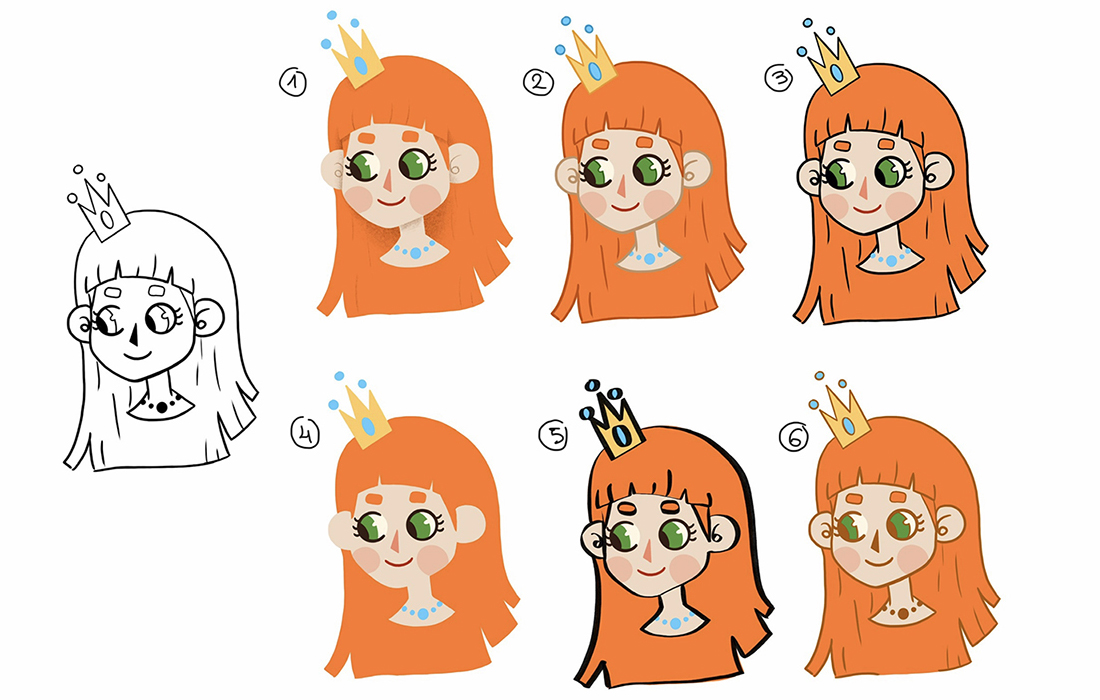
Both 1 and four are options without lines; the merely difference between them is that 1 has shading to differentiate key parts of the drawing, and iv does non. This makes all of the parts in the aforementioned color in the latter bleed together. Numbers 2, iii, 5, and 6 are different line options. 2 has colored lines, making information technology more subtle. The line is slightly darker than the fill. 3 has a black line, which makes the contour more noticeable. 5 also uses a black line, just information technology is tapered and contrasting thicknesses. 6 uses a darker color than the prototype colors, then its contours are more smooth than the black.
If you want to illustrate without lines and you don't feel comfortable cartoon the color in directly, you can ink first and so remove the line layer.
Each of us has our ain way of coloring an image. I am going to teach you lot a couple of very unproblematic ways to color both with and without lines.
In the following example, nosotros are drawing without lines, directly with colored shapes. First, we draw the base of the confront, and then nosotros add the details on it, such as the optics, nose, hair, etc. We tin do it using a castor or with the selection tool, filling in the line later.

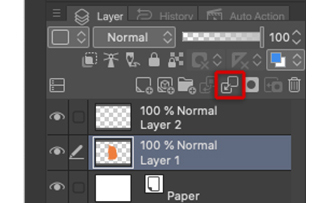
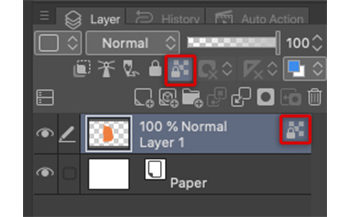
If we are non certain, we can create each shape in a dissimilar layer and then combine them by clicking [Combine to layer below] from the [Layer] window (meet below). Only there is no problem if you prefer to work in a single layer.
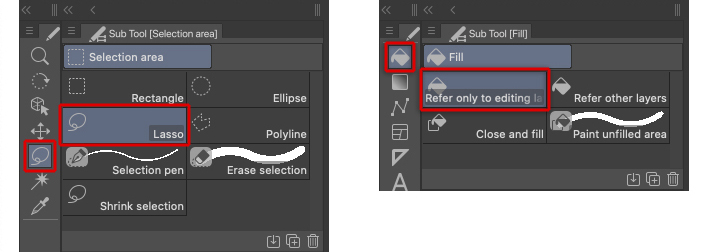
The second style to color our illustrations is the 1 I personally use most of the time. Starting time, nosotros create the full shape of the graphic symbol or object then make full it with colour. Normally using the [Choice expanse] > [Lasso] tool or creating the outline with a brush and filling it with the [Fill] > [Refer simply to editing layers] tool. In gild to do this, information technology is important to have a well detailed sketch, to have the line fine art already inked or to be very articulate most the shapes of the illustration.
From here, the process is simple, the color layer is blocked in the layer window, activating [Lock transparent pixels], the symbol will appear on the layer in which nosotros accept activated information technology. From in that location we can color the different parts of the drawing without coloring outside the previously created shape.
In the same way we can also add together shadows and highlights.
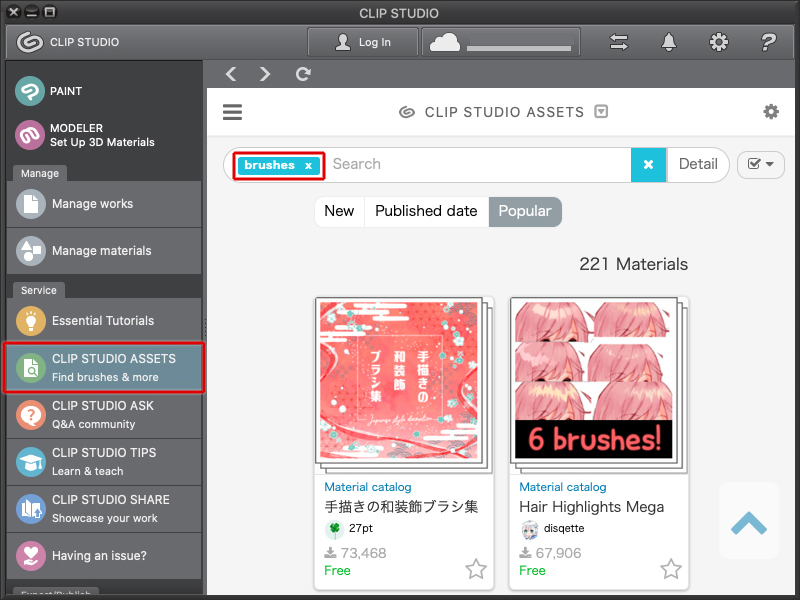
Both for coloring and inking y'all tin use a wide variety of brushes. Many of them are in the software by default, just there are also many brushes that we can download from [Clip Studio Assets]. Yous tin can create our ain brushes!
In my example, the illustrations will be mainly shapes of color, but I volition use shadows and certain lines to separate the flat colors. My textures will be created using a castor with the chosen colors and some other brush that simulates a graphite pencil, similar to creating lines and shading.
A trick to brand symmetrical elements seamless and easier to draw is to utilise the CSP symmetrical ruler. Go to the [Ruler] tool and select [Symmetrical ruler]. It is important that the number of lines is gear up to 2 and that the [Line symmetry] box is selected in the tool properties.

For example, to draw this piece of furniture I used the symmetrical ruler. I placed the guide at the midpoint where I wanted to draw the object, and I merely started drawing on one side of the image. The mirror epitome is created on the other side, so we can save a lot of work, while making sure that the object is perfectly symmetrical.
If there is a background with several components on information technology, I recommend creating a layer simply for the background and another for components and but combine them in one case yous are sure that you are happy with the result. Information technology is possible to change and fix things after merging, but it will be much easier if we take everything separate at first.
7. Text Insertion
Once the illustrations are finished, the but thing we accept left in the book to end is the text. Since we already had the structure planned during the sketching process, there should be no problem adding the text. This explains why sketching is the nearly important —if the base of operations is wrong, there volition exist complications following the next steps.
Within the volume and on the embrace, we will use the typography that we had previously chosen. Get to the text tool and create a text box, then paste the paragraph that corresponds to the illustration onto that page. Make sure that the text is centered and does not stick out of the guides that nosotros previously created so that the text is not cut during the printing process.
It is non necessary for the text to be in the aforementioned position on each page, information technology can be placed wherever it best harmonizes with the illustrations, equally long as they practise not hinder each other. The analogy must be visible, and the text must be readable.
Since nosotros decided that our volume is for six-year-olds, the text should not exist also large. A font size of approximately thirteen pt will be enough. If the book is for younger children, to arrive easier to read, it is advisable to increase the size of the font considerably.
We will align the text to the right and apply the [Discussion Space] to adjust it, trying not to exceed -.5 to .five. If you take short text, in that location will be no danger of creating negative infinite due to the lack of spacing out the words. Nonetheless, if your text is long, you should play with these values to avoid creating negative space as much equally possible. We can also play with line spacing by raising or lowering the values of [Line space], preventing text lines from coming together, or from leaving extremely large spaces.

Make sure that the text is correct, and there are no misspellings earlier creating the last certificate.
For the text on the cover, we will use the aforementioned process that we used on the body. On the back encompass, the following elements are placed: the synopsis of the book, the name of the illustrator, the publisher, and their website. Also, we will add together that the volume is available in an east-volume version (which nosotros will acquire how to do later on), the book's recommended age, and the price.
Other non-typographical elements that demand to exist added to the back cover are the publisher'south logo, which volition also appear on the spine and cover, and the bar code with the ISBN number, which serves to place the book.
The rest of the elements will be placed differently depending on the cover illustration, but remember that the illustration on the dorsum encompass is mere decoration. On the dorsum encompass, the information is more than important than the illustration. On the front end cover, the important parts are the title, the author, and the illustration.
8. Paging and impress preparation
At present that we have all the elements ready and our illustrated book is finished, we should export it. For that, it is ameliorate to number its pages. In a very short book, it is not necessary, but let me explicate how it's done for longer books.
Every bit we did before, right-click on one of the thumbnails of the page. In the menu that appears, select [Modify basic work settings].
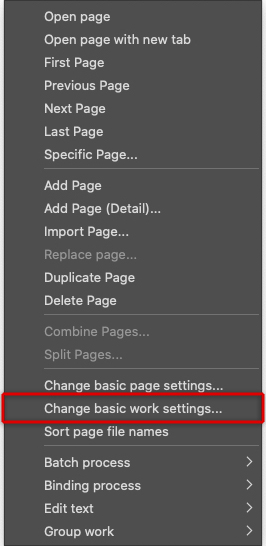
The window with the book settings volition open and in that location we will simply change the last section [Folio], leaving everything else as is.
If we desire the pages to first counting from the cover, we must write ane equally the [Kickoff number]. If nosotros want it to first from our first illustration, we demand to enter -2. The explanation is as follows: Exterior embrace -2, inside embrace -one, blank page 0, and our first illustration will exist number ane.
The color, size, and type of the page can also be inverse in this last section, only keep in mind that nosotros but take two color options, white or black, then choose the colour that stands out the almost on the majority of the pages.
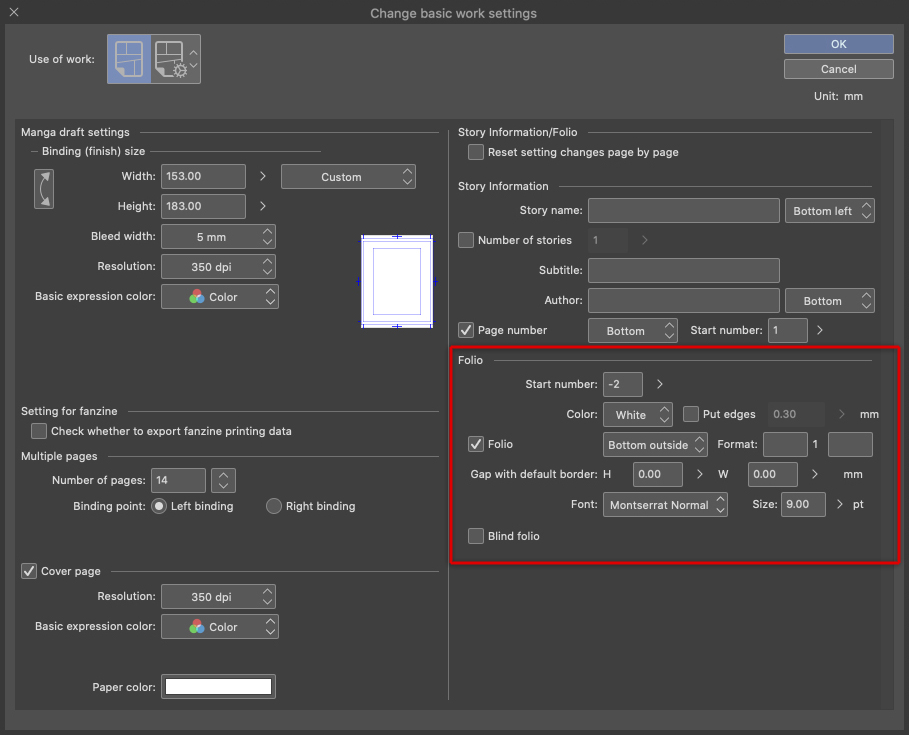
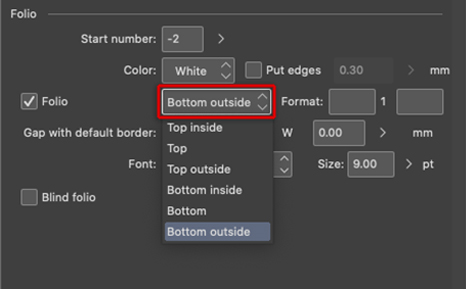
In the section [Gap with default border] we will go out both elevation and width with a value of nil. This is the distance of the pages from the [Default border] we created at the beginning of making the page. From the drop-down menu just below Color, we can choose the position of our folio numbers. For this book, we have called the Lesser exterior option. You tin can too effort out the other options and meet which one you lot like the nearly for your volume.
If our volume has a significant number of pages, we can take reward of 1 of the blank pages at the beginning between the embrace and the first illustration, or the last two, to add together an index once we have created the pages of the book. If we don't desire to add an index, it's perfectly fine to leave those pages bare, with a pattern, or with other types of book data such every bit where it was printed, print appointment, ISBN, etc.
Please note that the page number will not appear on the cover or on the other blank pages.
Once the page numbering is washed, we can consign the file for print. If you lot program on getting your book printed through an online printer, make certain to ask them what file format they utilise and what other basic requirements they accept, such as raster typeface, separate/folded pages, PDF file formats, etc. If you go it printed at a professional print store or at dwelling, you can export in either JPG or TIFF file formats.
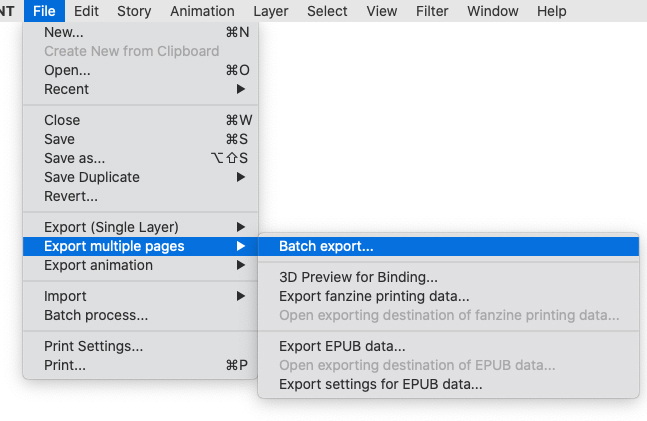
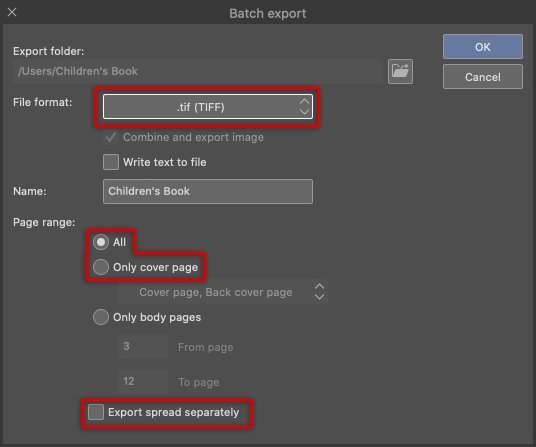
Go to [File] menu > [Export multiple pages] > [Batch export]. Cull the file to save the images from [File format]. I recommend saving them as TIFF files. In [Folio range], nosotros can choose if we want to export all pages or merely the comprehend. If yous want the pages to exist exported individually instead of in pairs, bank check the [Export spread separately] box. Doing this, the spine of the cover is likely to exist cutting, so it is advisable to export the embrace again separately and without checking this box.
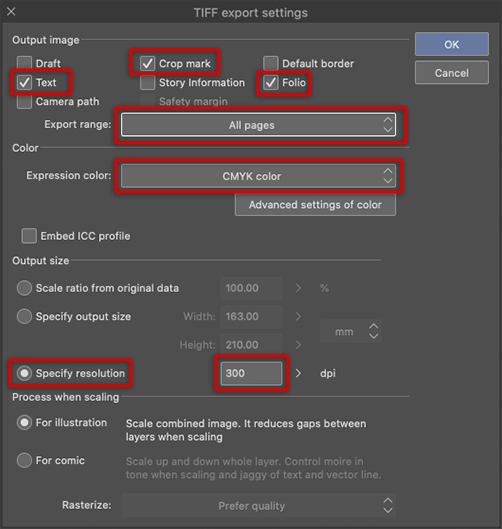
Click OK to open the TIFF file format export properties dialog box. The most important thing hither is to select the 3 epitome options at the meridian: [Text], [Ingather marking], and [Folio]. The first volition export the text, the second the crop marks, and the third the page numbers. Make certain that [All pages] is selected in the drop-down menu. This option opens up more than options.
If the page color hasn't been changed previously from RBG to CMYK, we tin can change information technology now. Nonetheless, changing the colour now will result in less vivid colors than working in CMYK from the outset.
The other selection that we tin can change again is the resolution, the document has a resolution of 350 dpi, and we tin can leave information technology that way, merely we simply demand 300 dpi. If you lot are printing from domicile or in a impress shop, we tin can lower the resolution even further to 150 dpi. This will make the file size much smaller. For online utilize, such every bit social media or an online portfolio, the resolution should be lowered to 72dpi. The rest of the options can be left as they are.
Later clicking OK, a dialog message appears letting us know that it may take a while to save the files in CMYK, confirm that it'due south OK to export your file. Later a few seconds (or minutes depending on the number of pages and the weight of the file), our pages will be in the binder we chose to export them to.
9. Digital version (EPUB)
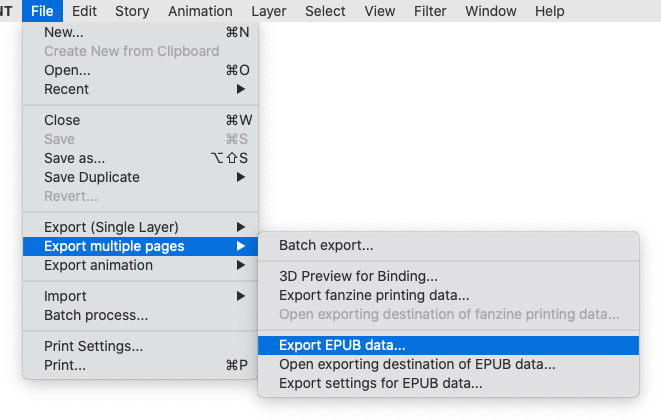
Perhaps y'all would like to make a digital version of your volume, an EPUB (Electronic Publication) version, instead of going to print with information technology, or maybe you want to do both. If we know from the beginning that we merely want the digital version, we can create the illustrations in RGB. Otherwise, we tin get to the [View] > [Colour contour] > [Preview settings] window and change the color mode once more from the drop-down menu earlier exporting the EPUB version. Exporting your book in EPUB format is uncomplicated; go to [File] carte > [Export multiple pages] > [Export EPUB data].
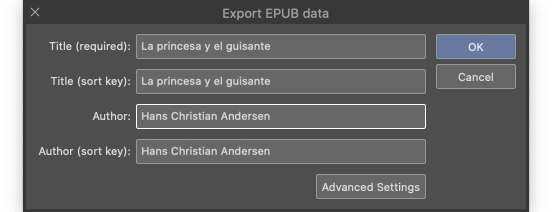
The following window volition appear. Here, add the title and writer of the volume to all iv corresponding fields so that one time published, it can be sorted by author or championship.
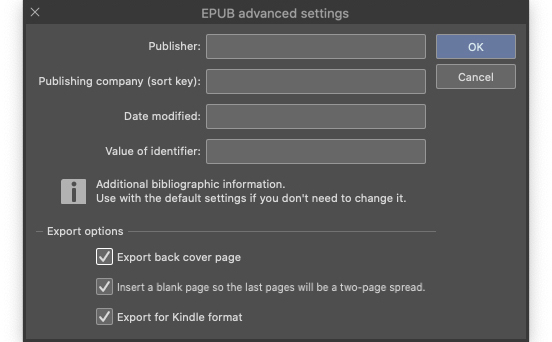
Click OK to export your EPUB file. If you desire to add information such as the proper noun of the publisher, make sure to do and then from the previous window. Click on [Avant-garde Settings] and add together the necessary information in the window shown beneath. In [Publisher] and [Publishing company (sort fundamental)], write the name of the publisher. In [Date of update], the export date volition display as default, simply you can alter it. The data will as well appear by default in [Value of identifier]. If you do not have a previous identification of the book you tin can leave the default values. Every bit for the three boxes that appear below you can check all three. [Export dorsum cover page] adds the back encompass to the EPUB file. [Insert a blank canvas] adds a blank page so that the last page is still shown every bit a double page. [Export for Kindle format] optimizes the display in Kindle format.
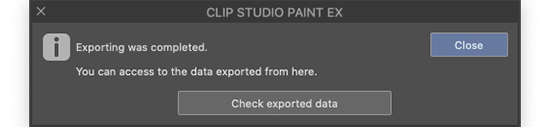
Whether you lot take filled in the advanced options or if y'all have left them with their default values, when you confirm both windows, the EPUB file will exist exported. At the stop of the process, the following confirmation message will announced. Click [Close] to close it.
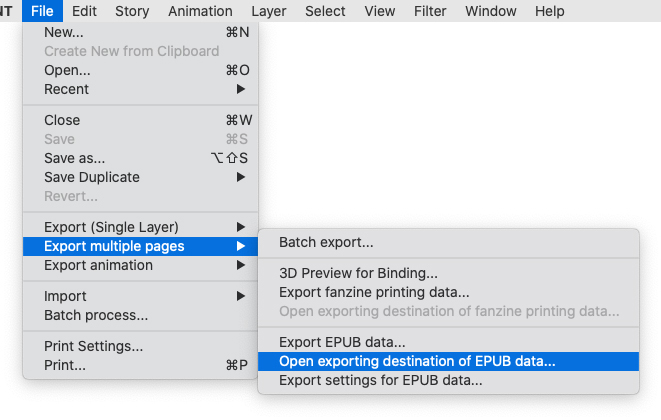
Before viewing our EPUB file, have into business relationship that the cover has a different size and therefore, will non be exactly the same equally in the printed version. My tip is to duplicate the file and edit the comprehend so that it adapts to these new measurements. When both the comprehend and the trunk are the same size, the but thing to keep in heed is that, in our EPUB file, the spine will disappear. To check the new file, go to [File] carte du jour > [Export multiple pages] > [Open exporting destination of EPUB data]. The EPUB file volition appear in the binder. Double click to open it with your digital book reader.
Now the file tin be uploaded to a website or portfolio for people to download, or to an eBook publishing platform. We can likewise upload our files to social networks directly by uploading the images of the illustrations. For that, remove the crop marks, alter the color contour from CMYK to RGB, and modify the resolution to 72 dpi. For more than data, please see the steps shown previously in this article. If yous want to show what the volume volition wait like in it's printed form, create a mockup image, and upload it.
This procedure in this article tin exist applied to any other type of book y'all desire to illustrate. Just make sure to attach to the main steps to go along the story in your final production clear.
10. Let'southward use Clip Studio Share
To share our volume online and view information technology in a 3D format, upload it to Clip Studio Share. With this link, you can view your volume in unlike ways. Information technology is useful for uploading comics, epitome galleries, and for sharing a direct preview on Twitter.
La Princesa y el guisante

Source: https://www.clipstudio.net/how-to-draw/archives/160469
Posted by: raygozaegesecun46.blogspot.com
0 Response to "how to illustrate a book if you can't draw"
Post a Comment